Last Updated on October 3, 2022 6:23 pm
October 3, 2022
Hard Drives offer great inexpensive storage with lots of capacity. While they don’t hold a candle to SSD’s when it comes to performance, you can’t beat the $/TB storage capacity of a hard drive, especially when it comes to 2TB or larger. That being said, most consumer level hard drives utilize a technology called SMR or Shingled Magnetic Recording. SMR could be an entire article unto itself, and am completing some extensive SMR disk testing so will share that at a later time. But for now will do my best to summarize it here:
SMR Summary
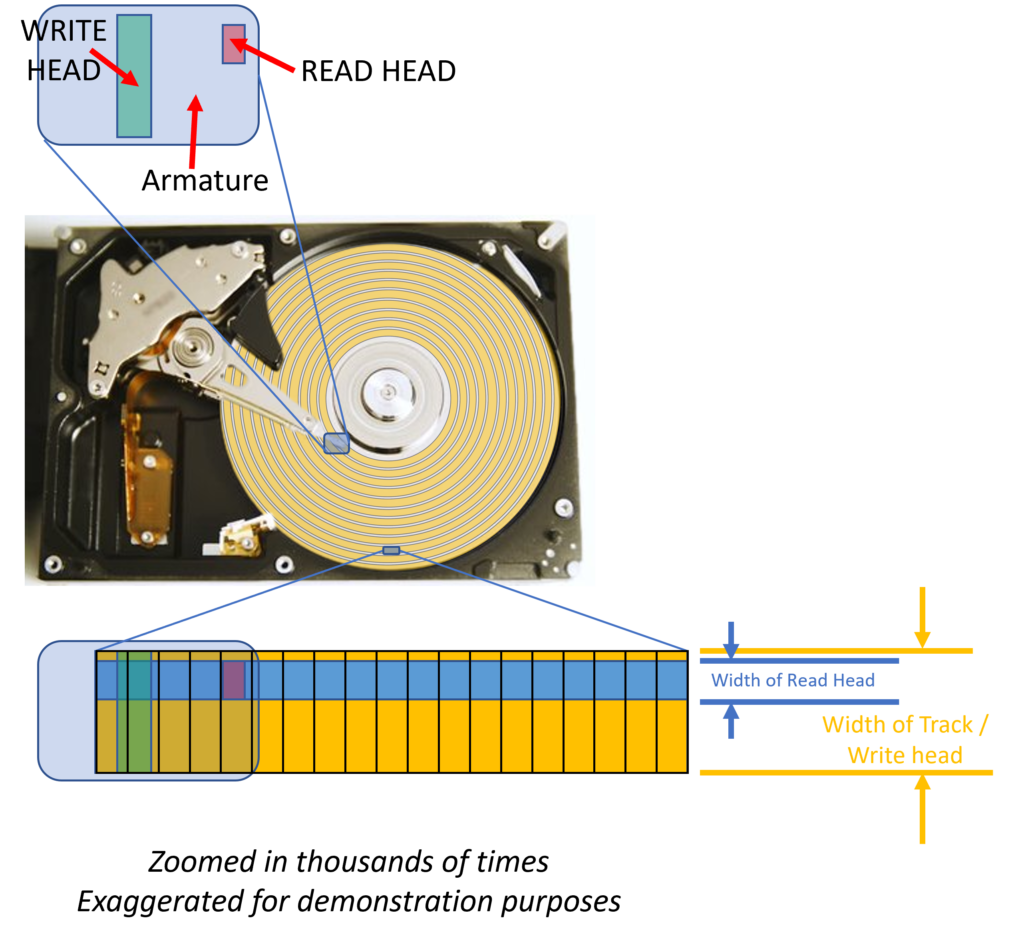
Conventional disks write tracks on the hard drive platters that can be easily overwritten with another pass regardless of what data exists there, this is called Conventional Magnetic Recording or Perpendicular Magnetic Recording (CMR/PMR). SMR writes data to a hard drive the same way, except it overlaps tracks to fit more data on a platter, which results in less expensive hard drives because they can use fewer platters for the same capacity as a CMR drive.
Without going into all the nuances about SMR, this just means your performance can and will tank once a disk has been written to enough times, deleting data, adding new data, and modifying existing files. A fresh clean fully wiped/formatted SMR hard drive should perform about the same as a traditional CMR drive until it has written enough data to fill it to capacity even if data has been deleted. This is where the performance can begin to take a dive.

Which disks use SMR technology?
How do you know your disk is SMR or not? Unfortunately disk manufacturers don’t clearly list this in the model specs of the disk. However due to lack of transparency and customers complaining, they did eventually identify which disks are SMR. Most consumer disks 8TB and smaller you should assume are SMR. For desktop drives, these include Seagate Barracuda, Western Digital (WD) Blue, Red (not Red Plus or Red Pro), and any 2.5″ / laptop / USB powered hard drives.
WD lists their drives here: https://blog.westerndigital.com/wd-red-nas-drives/
Seagate: https://www.seagate.com/internal-hard-drives/cmr-smr-list/
Toshiba: https://toshiba.semicon-storage.com/ap-en/company/news/news-topics/2020/04/storage-20200428-1.html
NASCompares has a comprehensive list of drives by model number as well: https://nascompares.com/answer/list-of-wd-cmr-and-smr-hard-drives-hdd/
Another indication may be the amount of cache on the hard drive. To help mitigate performance issues most SMR drives have substantially more cache. For example the SMR WD Red drives have 256MB cache whereas the WD Red Plus CMR drives have 128MB cache.
Writing over deleted data?
Normally a hard drive is “dumb”, in that it doesn’t know or care what data is on the drive, it just stores raw bits. It is the job of the file system to manage what data goes where. When you delete a file from a hard drive, the data is not removed right away, only the pointer in the file table that says where the data exists on the hard drive is removed. So this “dead” data remains on the drive until the file system determines to write to that location again.
For a CMR drive this is not a big deal, it just plows over that spot with new data and it is a done deal. With SMR, however, because tracks overlap, they have to separate the data into “SMR Zones” (about 256MB) where the data in this zone has to be rewritten to a new empty zone with only the good data, and eliminating the dead data then clearing out the original SMR zone for future writes.
Because the hard drive is “dumb” it does this in real time when the write command is sent, so that can make performance suffer because it has to read an entire zone and then rewrite to a new zone without the dead data and clear out the old zone. If you are writing a lot of files that span across zones, this can result in single digit MB/sec write performance.
Defragmentation and TRIM
How can this be mitigated? Well fragmentation occurs when files are deleted and new files written. It’s inevitable. File systems do their best to try to keep it under control, but it will get worse over time the more files that are modified, deleted, written. With Windows NTFS, you can defragment the disk which should help improve performance in this condition. However, with an SMR disk, since it doesn’t know what sectors contain live data and which ones contain deleted data, it will just shuffle them all around together and won’t improve the condition.
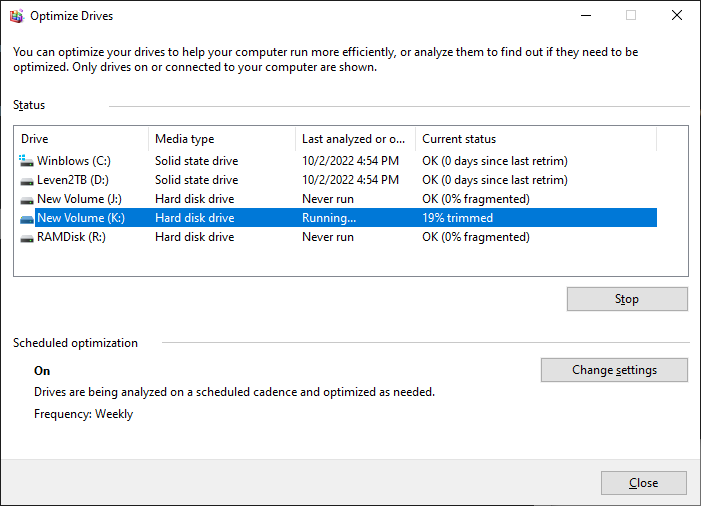
This is where TRIM comes in. TRIM is known as pretty much a required feature for SSD’s for a similar reason. TRIM tells the hard drive (or SSD) when a file is deleted what sectors those files occupy. This requires the SSD and the operating system both to be “TRIM aware.” Thankfully Windows has been “TRIM aware” since Windows 8 and doesn’t require any special action the user’s part.
However, earlier SMR disks do not support the TRIM feature. The only way to get performance back is to completely wipe the drive (i.e. full format) and restore the files back on the drive.
With TRIM, however, once the disk knows what data is deleted, it can run its own routine when the disk is idle and clean up SMR zones so it can minimize any future write performance degradation. But fragmentation can still be an issue.
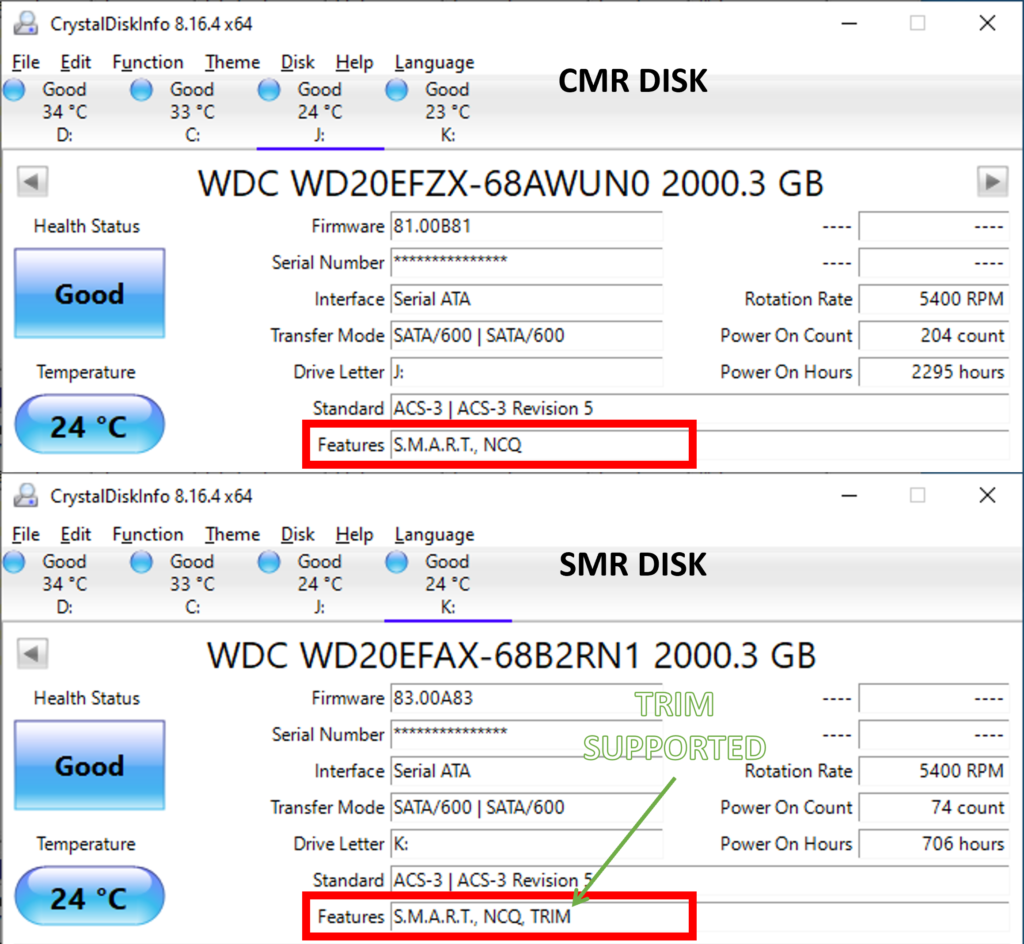
How do you know if TRIM is active? In Windows here are a couple ways. One is to grab a useful disk utility called “CrystalDiskInfo” (https://crystalmark.info/en/download/). Don’t be scared off by the anime skins for the app, as those are purely optional, LOL. The default skin is basic and professional. Once you run it, you will see under “Features” attribute if TRIM is listed.
Another way is to open an elevated command prompt (“administrator”), determine the drive letter of the hard drive you want to check (i.e. “F:”), and type the following command:
DEFRAG F: /L
This will attempt a Retrim. If the disk supports TRIM, the TRIM command will run and show results. If it does not support TRIM it will say TRIM is not supported.
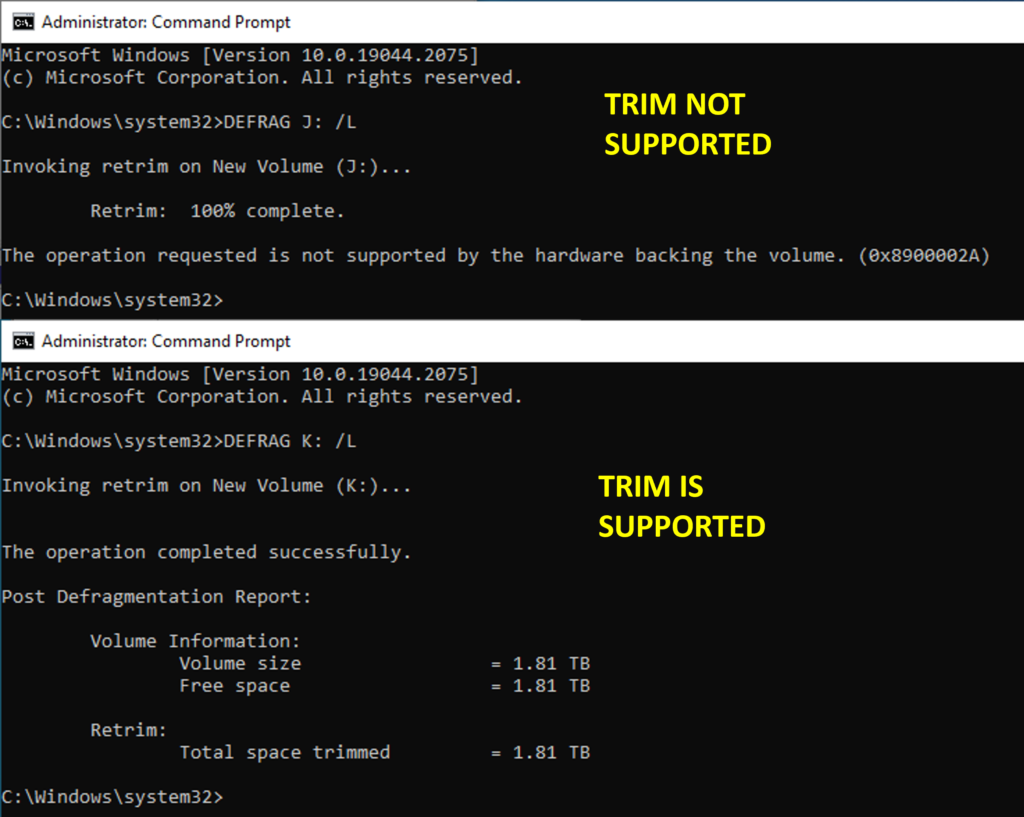
If the TRIM command was successful, you can full Defrag the disk either from the command line:
DEFRAG F: /O
Or go to Windows “Defragment and Optimize Drives” GUI. Just type “defrag” in Windows search and select “Defragment and Optimize Drives”. There you can select your drive and choose “Optimize”. It will go through a TRIM and Defrag. This is the same as the command line ‘DEFRAG F: /O‘ command above. Either one of these can and will take quite a while to complete, so be patient.
It isn’t a bad idea to implement this command periodically to keep your disk fresh. Upon deletion of a file, TRIM should send that info to your disk automatically, but a regular TRIM/defrag command every few weeks should keep your disk in good working shape. Also remember to give your disk some idle time, not just plug in the disk, do your writes, then unplug it. The disk will have no time to manage the SMR zones to keep performance fresh.
Linux file systems can support TRIM as well, but depends on the distro and whether it is enabled or not.
You can mitigate all these issues by just not buying an SMR hard drive. But in case you already have one, or found a good deal on a drive, hopefully these tips will help. SMR disks are also fine as archival storage because they are mostly write once, read many. To get non SMR drives, however you will likely have to buy a “NAS” or “Enterprise” or “Datacenter” disk. These are more expensive, but don’t have the issues associated with SMR.
Summary
- SMR disks lose performance after extensive write/modify/delete/write actions
- SMR disks that don’t support TRIM that lose significant write performance should be able to regain that performance after a full disk format.
- TRIM helps keep the disk performance tolerable, but disk and operating system need to support TRIM command
- Manual TRIM and defrag periodically should keep your SMR disk running smoothly
- Most consumer hard drives 8TB and under are likely SMR. You have to buy a “NAS” or “Enterprise” or “Datacenter” class disk to avoid SMR.
Sorry to revisit this a couple of years later, this is still one of the best articles on the subject, bar one tiny detail.
Strictly speaking even an OS level full format or zero-wipe isn’t guaranteed to restore performance on all SMR drives, Seagates in particular can be finicky. As you’ve identified, the drive is operating at a lower level, and it can’t tell whether those zero blocks you’ve written are truly empty, or are intentionally full of zero data (say a thick VM image). The only 100% repeatable way to restore performance on all SMR models is by having the drive controller do the wipe itself by issuing an ATA erase or ATA secure erase command. This effectively works as a full disk TRIM (and zero or pattern write).
Sadly it’s 2024 and WD seem to be the only manufacturer actually implementing TRIM rather than still trying to hide these drives in their existing CMR product lines. SMR is actually quite a neat technology, if the marketing hadn’t made for a terrible implementation. They have a bad reputation, because they’re treated like CMR drives by operating systems that don’t know they’re special – eg. by default, Windows runs defrag on a schedule so even moderately full drives can go off the edge of the performance cliff without the user knowing anything about it.